Работа с WebFTP (файловый менеджер)
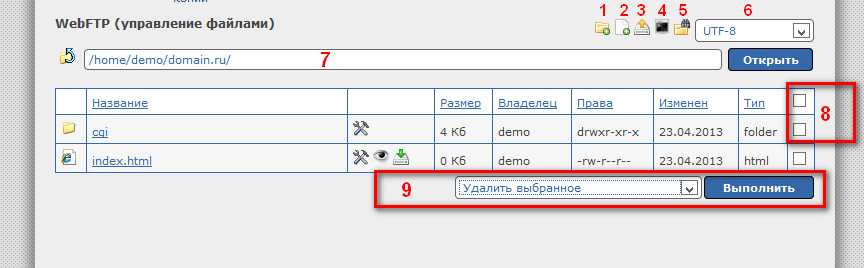
- Создание новой папки — откроется форма, где можно написать название своей папки, которую мы хотим добавить.
- Создание нового файла — так же как и папку, можно создать и файл с любым расширением, например index.html
После добавления файла, нажмите на него чтобы открыть его для редактирования или смены кодировки. - Загрузки файла на сервер. Загрузить файлы можно различными способами, такими как:
· Загрузка файлов с компьютера.
· Загрузка файла (архива) по ссылке (пример: http://domain.ru/archive.zip).
· Загрузка файлов через подключение к удаленному серверу по обычному FTP серверу. - Выполнение команд SSH (актуально на тарифах с SSH). Открывается форма для отправки команд SSH (пример использования — пункт 2).
- Проверка папок и количества файлов в этих папках. Вывод информации осуществляется для первых 100 папок.
- Выбор кодировки, в которой необходимо отображать ваши файлы.
- Путь где мы сейчас находимся. Также в этой строке можно в ручную написать путь — при нажатии кнопки Открыть откроется прописанная папка или файл, если путь существует и если мы прописали путь вместе с файлом (например /home/user/html/index.html).
- Выделение всех файлов и папок в директории — напротив всех файлов появятся галочки и подсветятся строки, также можно выделить отдельно ту или иную строку, если необходимо сделать какую-нибудь определенную операцию с некоторыми файлами или папками (например запаковать в архив или удалить).
- Выпадающее меню действий с выбранными файлами и папками. Рассмотрим их чуть подробнее:
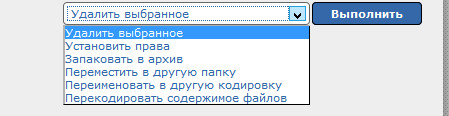
· Удалить выбранное
Удаляет выбранные файлы и папки. После удаления восстановить их нельзя.
· Установить права
Установка прав файлам или папкам. Как выбирать файлы — написано в пункте 8 выше.
· Запаковка в архив
Запаковка выбранных файлов или папок в .tar или сжатый . tar.gz архив, вместо станартного названия archive можно прописать свое и рядом выбрать тип архива.
· Переместить в другую папку
Перемещение папок или файлов в другую папку. Для этого надо выбрать нужные папки для перемещения и в поле перемещения указать путь.
· Переименовать в другую кодировку
Изменяет кодировку названий выбранных файлов.
· Перекодировать содержимое файлов
Изменение кодировки содержимого в выбранных файлах.
Наротив каждой папки или файла имеются иконки:

- Изменение свойств файла или папки.
- Просмотр файла — открывает файл в окне браузера для просмотра.
- Скачать файл — дает возможность сохранить файл на компьютере.
- Распаковать архив — распаковывает архив. Распаковка происходит также, как бы вы делали бы это на своем компьютере, т.е. если в архиве лежит папка с файлами, то и в WebFTP возле архива появится папка с этими файлами.
Пункт 1 относится как к папкам так и к файлам, 2 и 3 пункты — только к файлам.
4 пункт доступен только у архивов (.rar, .zip, .tar, .tar.gz).
Теперь рассмотрим пункт 1 более детально:
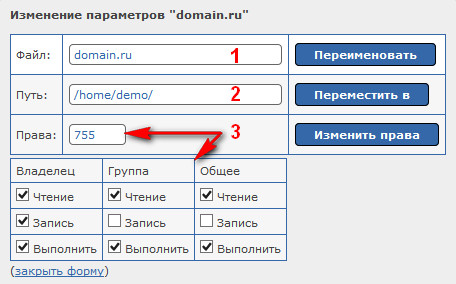
- В свойствах папки мы можем переименовать файл или папку. Если переименовываете папку домена, то не забудьте изменить путь до неё в настройках своего домена Домены → Настройки (напротив своего домена) → полный путь к домену).
- Также можно переместить файл или папку в нужное место, отредактировав путь в пределах своего аккаунта, то есть не выше /home/user/.
- Можно изменить права того или иного файла или папки выставляя или наоборот убирая галочки. Если не хотите ничего изменять — то просто закройте форму.
Вот так достаточно просто можно манипулировать файлами, папками и доменами в пределах своего аккаунта.